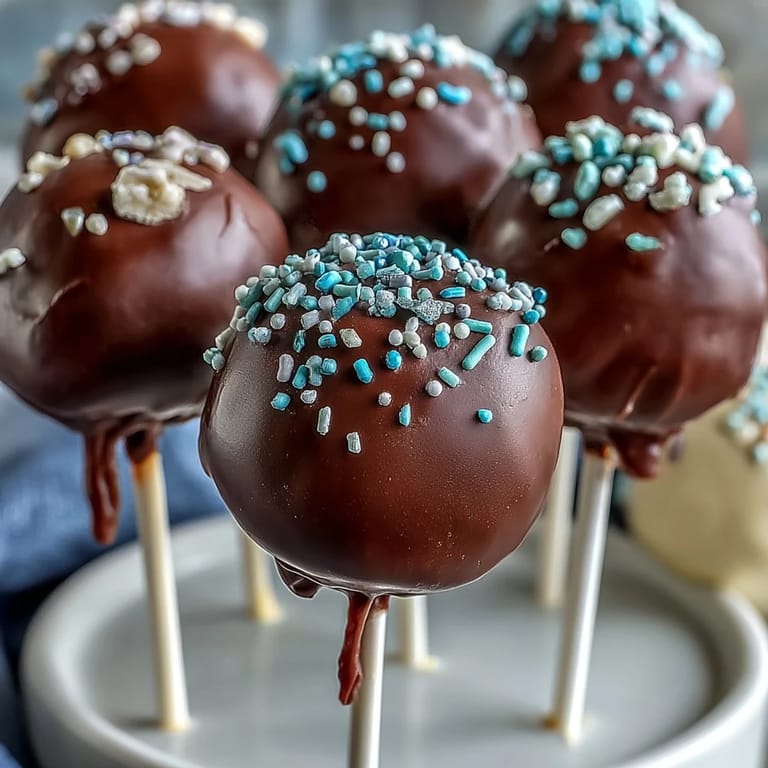
 Pin Now
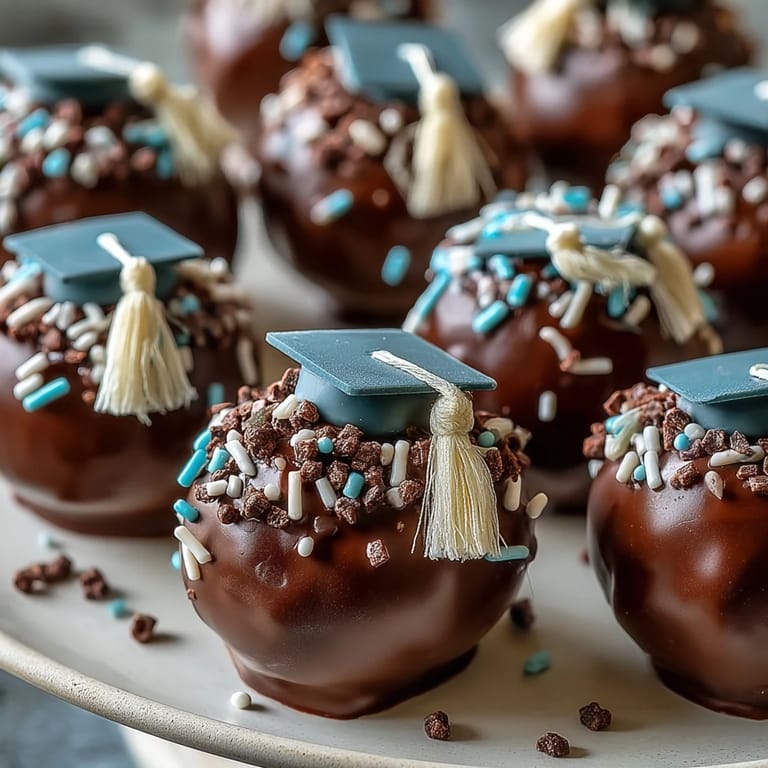
 The first time I made graduation cake pops, I was surrounded by a chorus of laughter and the competitive spirit of my teenage cousin, who insisted hers would be the most sparkly. The kitchen looked like a confetti parade, with candy melts splattered on aprons and a silent battle for the best school color combinations. I remember the gentle clatter of lollipop sticks and the sweet scent of buttercream drifting through the air as we debated if blue and yellow glitter would clash. Each pop was a little triumph, even the ones that refused to stay round—or straight. Decorating these always turns into a playful event, and somehow, there's permission to be as over-the-top celebratory as you like.
Last spring, we lined up dozens of cake pops for my niece's graduation, each one carefully decorated while our playlist spun through old school favorites. Her friends arrived early just to claim their favorite colors and, after a few giggles over lop-sided caps, there were sticky fingers and big smiles all around. It didn't matter if some pops looked slightly wonky—every single one disappeared before evening. That kitchen was filled with a sense of accomplishment and, honestly, a lot of chocolate crumbs on the floor. By the end, the pops stood upright in their foam block, waiting like a proud little army for their moment.
Ingredients
- Vanilla or chocolate cake mix: Using a boxed mix (or homemade cake) gives a reliable base, just be sure it's fully cooled before crumbling for perfect texture.
- Cream cheese or buttercream frosting: Mixing just enough frosting is key—the secret is to add slowly and feel the dough as it starts sticking together.
- Candy melts in school colors: Choose bold hues and melt them gently to avoid seizing; coloring white chocolate works if you can't find the right color.
- Vegetable shortening: Helps thin your chocolate coating for smooth dipping, but don't overdo it or your pops won't set.
- Sprinkles, edible glitter, colored sugar: Toss them on while still wet so they really stick—don't wait!
- Lollipop sticks: Insert with a twist for extra security and sturdiness.
- Mini chocolate chips: These make adorable tassels; press them in before the coating dries.
- Fondant in school colors: Optional but ideal for cap decorations—cut little squares to finish the look.
Tired of Takeout? 🥡
Get 10 meals you can make faster than delivery arrives. Seriously.
One email. No spam. Unsubscribe anytime.
Instructions
- Bake Your Cake:
- Begin by following the instructions for your cake mix or recipe, and let the cake cool fully so it crumbles easily. The fragrance of cake fills the kitchen, cueing the start of celebration.
- Crumble and Mix:
- Break up the cooled cake into tiny crumbs with your hands or a food processor. Blend in the frosting, starting gently, until it clumps together like soft clay.
- Shape Cake Pops:
- Roll the mixture into tight balls, feeling the smooth surface form as you go. Place them on a lined baking sheet and chill so they set up for dipping.
- Melt and Prepare Coating:
- Melt candy melts in short intervals, stirring until silky—watch for the shine. If thick, stir in a bit of shortening so it flows easily.
- Insert Lollipop Sticks:
- Dip each stick tip in melted chocolate, press halfway into each cake pop ball, and let them firm up together. This ensures the ball stays on the stick when dipped.
- Dip and Decorate:
- Fully submerge each pop, letting excess drip before decorating with sprinkles and sugar. Move quickly to add fondant caps and mini chips so the coating is still tacky.
- Set and Serve:
- Stand the decorated pops upright in a styrofoam block and let them harden completely. Once the coating is set, they're ready to serve and celebrate!
 Pin Now
 Watching my little brother hand out pops with matching school colors at his big graduation bash, I realized these treats had become more than dessert—they were mementos. The crowd's excitement made me appreciate how tiny sweets can put massive smiles on faces and bring people together in celebration.
Making Cake Pops Stand Out
Experimenting with edible markers and glitter ended up creating pops everyone wanted to photograph. Let the coating set just enough so the designs don't smudge, and cluster them in bright bouquets as a centerpiece for extra attention.
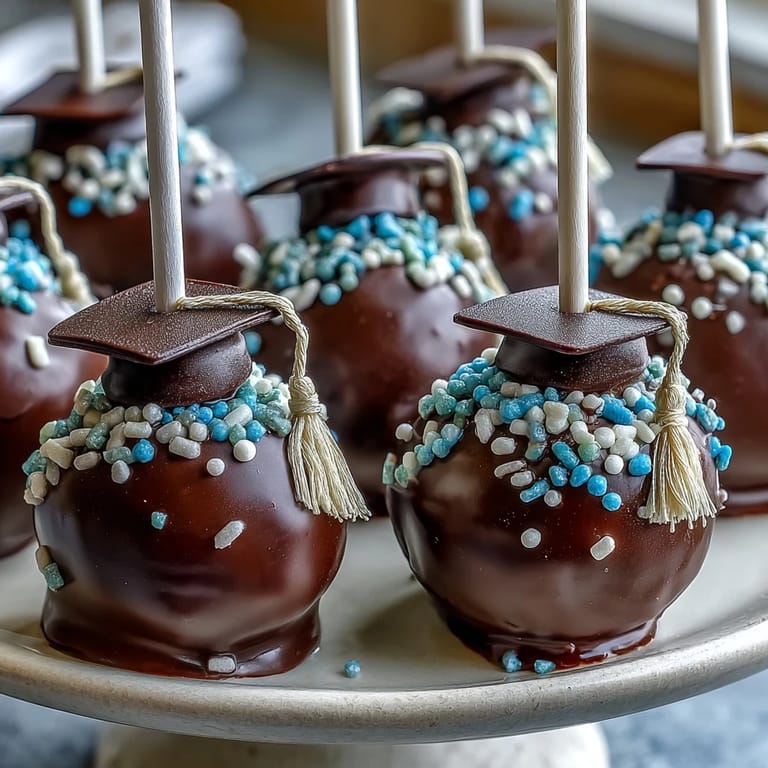
Mastering Fondant Caps
Sculpting miniature fondant caps is easier than it looks—cut squares early, and press mini chips on while the chocolate is still wet. Have a damp cloth nearby to wipe sticky hands, and always let the caps dry fully before packaging.
Quick Color Swaps for School Spirit
When you need a new color, just swirl candy melts with colored dust or fold in gel coloring for vivid results. Swapping between blue and white is quick with separate bowls and clean spoons—avoid mixing, or colors might dull. If you run short on sprinkles, edible glitter steps in for extra sparkle.
- Don't crowd pops while setting or they stick together.
- Boxing them upright keeps decorations safe.
- Let everyone decorate their own for more fun.
 Pin Now
 Sharing graduation cake pops feels like gifting school pride on a stick. Celebrate with color and creativity—these treats are as joyful to make as they are to give.
Recipe FAQs
- → How do I choose school colors for cake pops?
Select candy melts or food coloring to match your school's official colors for the coating and decorations.
- → Can I use homemade cake instead of a mix?
Yes, a fully cooled homemade cake works great for crumb base. Adjust moisture with frosting as needed.
- → What’s the best way to shape cake pops?
Roll tablespoon-sized portions between your hands to form even, smooth balls before chilling.
- → How do I ensure chocolate coating is smooth?
Melt coating in short increments and stir; add shortening if needed. Tap excess off gently for a neat finish.
- → Can I make gluten-free graduation cake pops?
Use gluten-free cake mix and check all decorations for gluten content. Substitute as necessary.
- → How should cake pops be stored?
Store in an airtight container at room temperature for up to 3 days, or refrigerate for a week.