 Pin Now
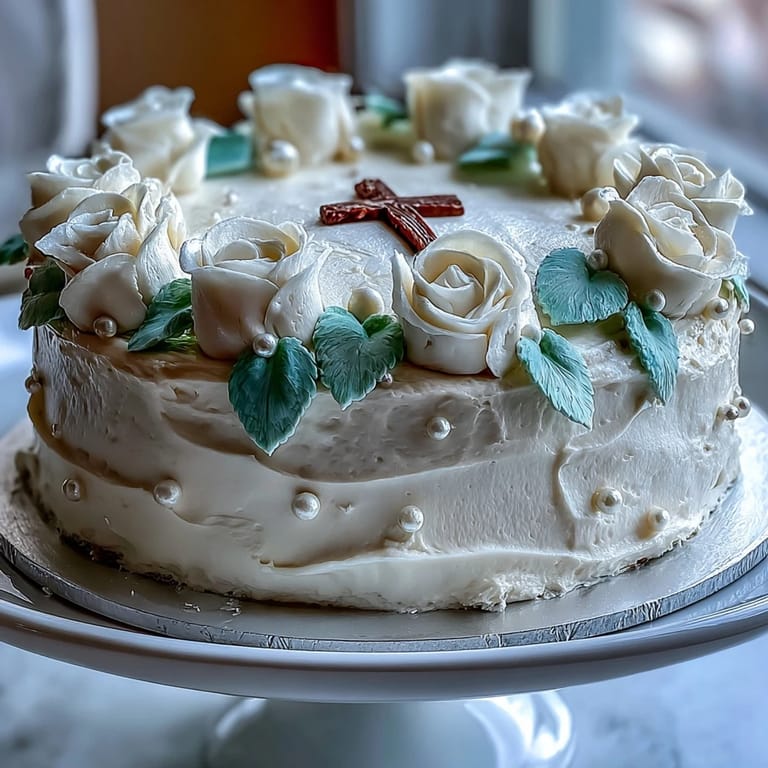
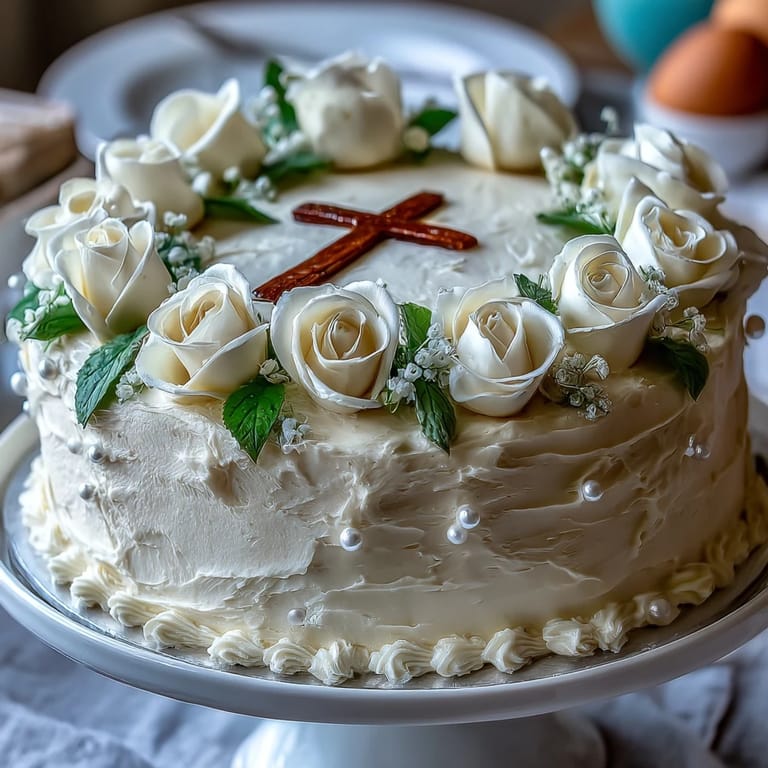
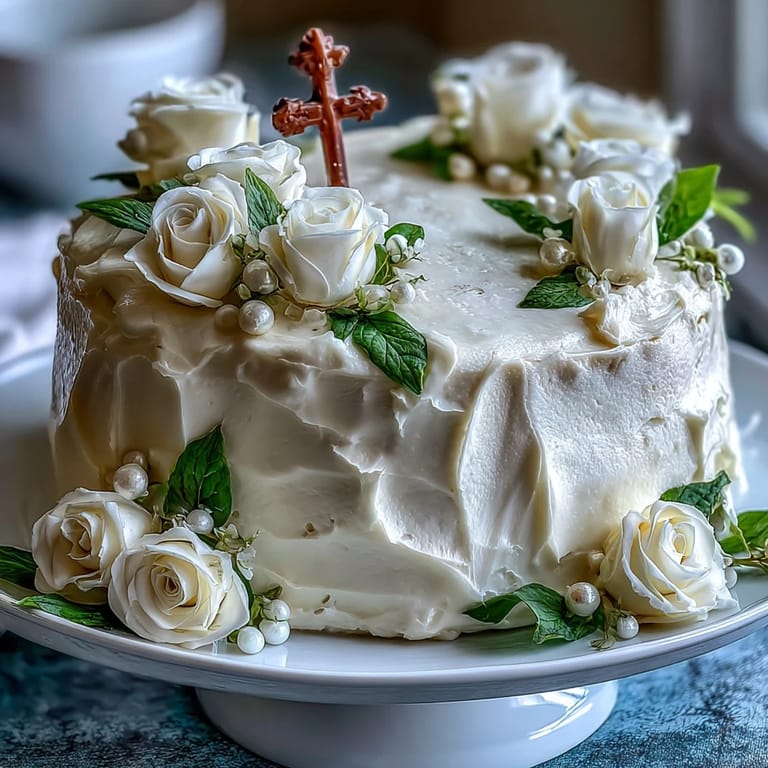
 My cousin Margaret stood in her kitchen three days before her daughter's First Communion, hands trembling slightly as she showed me the cake design she'd sketched on a napkin. She wanted something timeless, something that would photograph well for the church hall but also feel like a real cake made with love, not ordered from some sterile bakery. That's when I realized this vanilla sponge with fondant roses and a delicate cross wasn't just a dessert—it was going to be the centerpiece of a memory. We started that afternoon, flour dust catching the light from the kitchen window, and I learned that baking for sacred moments requires both precision and heart.
I still think about how Margaret's daughter's eyes widened when she saw the finished cake sitting in the community center, those white roses catching the afternoon light streaming through the stained glass. Several guests asked if we'd ordered it from a fancy pastry shop, and Margaret just smiled and whispered that her cousin had made it. That's the moment I understood why this cake matters—it's a edible declaration that someone cared enough to learn something new and difficult, all in honor of you.
Ingredients
- All-purpose flour: Choose a quality brand you trust; cheaper flours can make the crumb dense and heavy, and you want this cake to be cloud-like.
- Baking powder: Don't skip the full amount, and make sure yours is fresh—baking powder loses potency over time, and stale leavening will sink your cake literally.
- Unsalted butter: Room temperature is non-negotiable here; cold butter won't cream properly and you'll end up with dense pockets instead of even crumb.
- Granulated sugar: This feeds the butter and helps create that light, fluffy structure that makes the cake tender.
- Eggs: Bring them to room temperature by leaving them on the counter for 30 minutes; cold eggs refuse to incorporate properly and can break the emulsion.
- Pure vanilla extract: The real stuff makes an enormous difference in flavor depth; imitation vanilla tastes one-dimensional by comparison.
- Whole milk: Room temperature milk mixes smoothly into the batter without shocking the butter mixture.
- Powdered sugar for frosting: Sift it before measuring, or you'll end up with a frosting so stiff you can barely spread it.
- White fondant: Quality fondant is worth the investment; cheap fondant tears easily and tastes waxy, while good fondant is supple and surprisingly pleasant.
- Edible pearls or dragees: These small touches transform a homemade cake into something that looks professionally decorated.
Tired of Takeout? 🥡
Get 10 meals you can make faster than delivery arrives. Seriously.
One email. No spam. Unsubscribe anytime.
Instructions
- Prepare your pans and preheat:
- Grease the cake pans generously, then line the bottoms with parchment paper circles—this double protection ensures your cakes release without tearing. Get your oven to 350°F (175°C) while you gather everything, since you'll need to move quickly once the batter is ready.
- Combine your dry ingredients:
- Whisk flour, baking powder, and salt together in a medium bowl, breaking up any lumps of baking powder you find. This step distributes the leavening evenly, which is what gives you that delicate, even crumb.
- Cream the butter and sugar:
- Beat softened butter and sugar together for a full three minutes until the mixture is pale, fluffy, and noticeably lighter in volume. This isn't just about combining ingredients—you're aerating the butter, creating tiny air pockets that expand in the oven and make the cake rise.
- Add eggs one at a time:
- Crack each egg into the mixture, beat well, then add the next one; rushing this step or adding eggs all at once can cause the batter to look broken and grainy. Between each egg addition, you'll see the mixture get briefly confused before coming back together—that's normal and means the emulsion is holding.
- Stir in vanilla extract:
- This goes in after the eggs have fully incorporated, adding its gentle vanilla warmth to the base.
- Alternate flour and milk carefully:
- Start with flour, then milk, then flour, ending with flour; this pattern prevents the batter from becoming too wet in the middle of mixing. Use your mixer on low speed and mix only until you don't see streaks of flour anymore—overmixing creates a tough, dense cake.
- Fill your pans and bake:
- Divide the batter equally between pans and smooth the tops gently with a spatula; bake for 30 to 35 minutes until a toothpick inserted in the center comes out clean or with just a few moist crumbs clinging to it. Let the cakes cool in the pans for 10 minutes—this prevents them from cracking—then turn them out onto wire racks to cool completely.
- Make your buttercream frosting:
- Beat softened butter until creamy and lighter in color, then gradually add sifted powdered sugar bit by bit so you don't end up with a flour-like cloud around your mixer. Once the sugar is mostly incorporated, add vanilla and salt, then milk or cream one tablespoon at a time until you reach spreadable consistency.
- Level and crumb coat:
- Use a serrated knife or cake leveler to make sure your cake layers are flat and even, then place the first layer on your cake board and spread a thin layer of frosting on top. Add the second layer, then coat the entire cake with a thin layer of frosting—this catches all the crumbs so your final frosting layer stays pristine—and chill for 20 minutes.
- Apply the final frosting layer:
- Spread a smooth, final layer of buttercream over the chilled crumb coat, using an offset spatula and a bench scraper to keep the sides even.
- Create fondant roses:
- Roll small balls of fondant, flatten them slightly, then shape them into petals by working them gently with your fingers; start with three petals for the center, then layer additional petals around the outside, turning the rose slightly as you work. This takes practice and feels impossible at first, but once you've made three or four, your hands learn the motion and they start looking legitimate.
- Add leaves and details:
- Tint a small portion of fondant green if desired and shape thin leaves, then arrange roses and leaves on the cake as you wish. Add edible pearls or dragees for sparkle and sophistication.
- Place the cross topper:
- Position your cross topper at the center of the cake or wherever feels most meaningful, pressing it gently into place. Chill the finished cake until serving time.
 Pin Now
 After Margaret cut the first slice at the reception, her daughter whispered to me that it was even better than she'd imagined. That quiet compliment, that moment of genuine joy, reminded me that celebration cakes aren't really about perfect roses or flawless frosting—they're about showing up with flour under your fingernails and love in your heart. The cake tasted like vanilla and butter and promises, which is exactly what a First Communion cake should taste like.
The Secret to Professional-Looking Fondant Roses
The first time I tried making fondant roses, I ended up with something that looked like a tiny brain, and I almost gave up entirely. But then I realized the problem wasn't the fondant or my hands—it was my impatience. Fondant roses need time and a light touch, and you have to let the petals dry slightly as you build them, otherwise they fuse into one blobby mass. Roll your petals thin, work slowly, and don't be afraid to let them sit for a minute or two between adding petals.
Why This Cake Feels Special Without Fancy Techniques
One of my friends assumed this cake required professional piping skills or airbrushing or some other technique she'd never master, but here's the truth: it doesn't. The vanilla sponge is forgiving, the buttercream is simple enough that anyone can make it smooth, and fondant flowers are actually easier than piping because you can hide imperfections by letting the leaves and details do the work. The magic isn't in technical difficulty—it's in the fact that you made it yourself, and that shows in every imperfect rose.
Make-Ahead Magic and Storage
The real benefit of this cake is how beautifully it handles advance preparation, which means you can split the work across several days instead of panicking the morning of the celebration. The sponge layers can be baked up to three days ahead and kept in an airtight container at room temperature, the buttercream can be made two days in advance and refrigerated, and you can even make the fondant roses a full week ahead and store them in an airtight container away from moisture. The only thing you'll do the day-of is assemble and decorate, which takes about an hour and feels manageable even if you're nervous.
- If you refrigerate frosted cake layers, let them come to room temperature before decorating or the fondant will be brittle and prone to cracking.
- Don't refrigerate decorated fondant roses, or they'll absorb moisture from the cold and become sticky and difficult to position.
- Transport the finished cake to an event in a sturdy cake box, keeping it as level as possible and placing it in a cool spot in your car rather than in direct sunlight.
 Pin Now
 This cake has a way of becoming the cake that people ask you to make again and again, because it's elegant and personal and tastes like real butter and vanilla, not artificial glamour. Make it once and you'll understand why Margaret still has a photo of it on her kitchen counter.
Recipe FAQs
- → How do I achieve a tender vanilla sponge?
Ensure butter and sugar are creamed thoroughly until light and fluffy, and alternate dry ingredients with milk gently to avoid overmixing, which keeps the sponge tender.
- → What is the best way to shape fondant roses?
Roll small fondant balls, flatten and shape each into petals, then assemble by layering petals carefully to form realistic roses.
- → Can I add flavor variations to the sponge layers?
Yes, adding lemon zest or almond extract to the batter enhances fragrance and adds a subtle twist without altering texture.
- → How should I store the finished cake before serving?
Keep the decorated creation chilled to maintain the buttercream and fondant integrity, and bring to room temperature shortly before serving.
- → Are there alternatives to butter in the sponge for a lighter result?
Substituting half the butter with vegetable oil provides a lighter crumb while maintaining moisture.
- → What tools are recommended for decorating with fondant?
Use rolling pins for thinning fondant, shaping tools for petals, and an offset spatula for smooth frosting application.