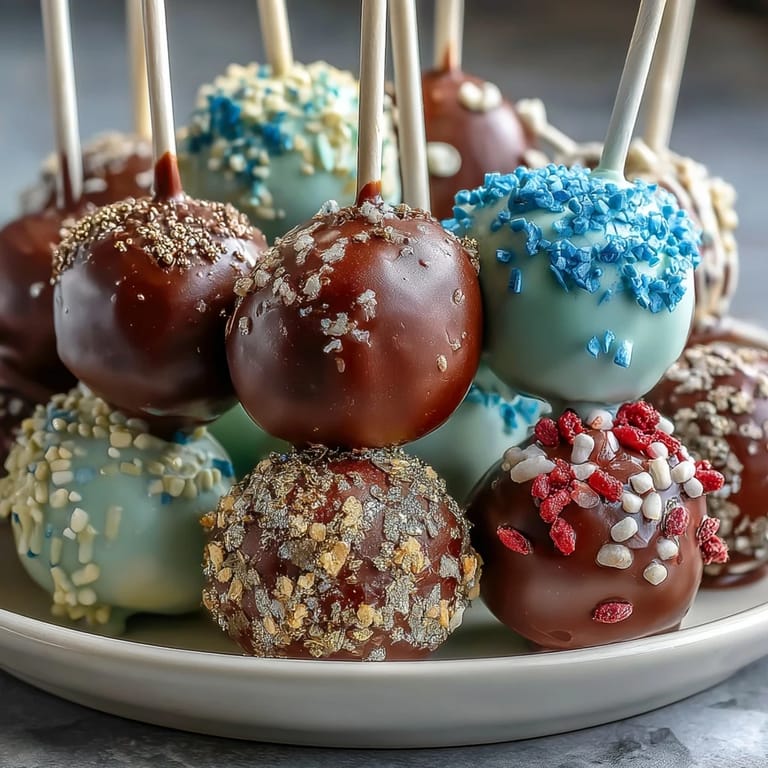
 Pin Now
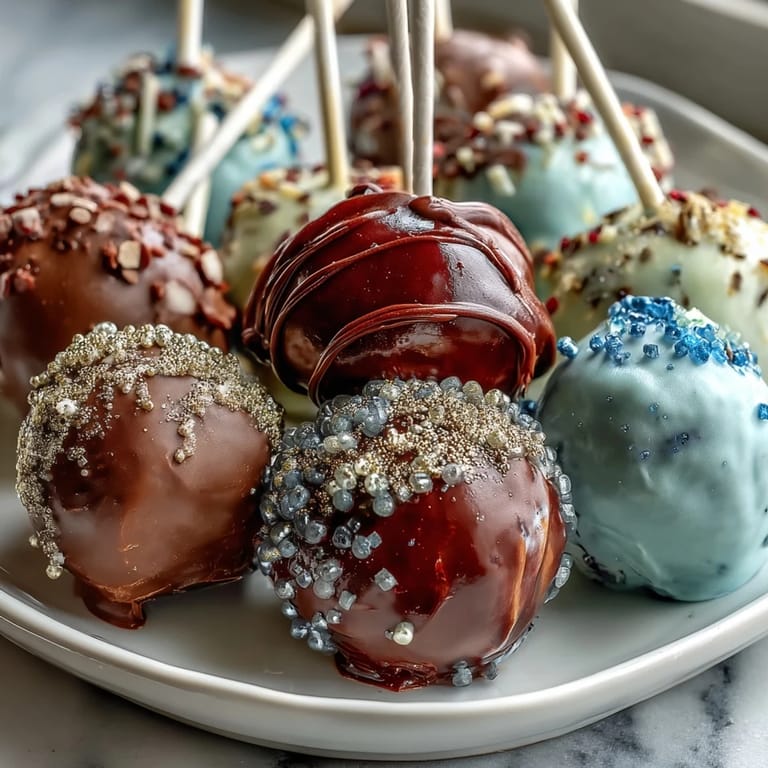
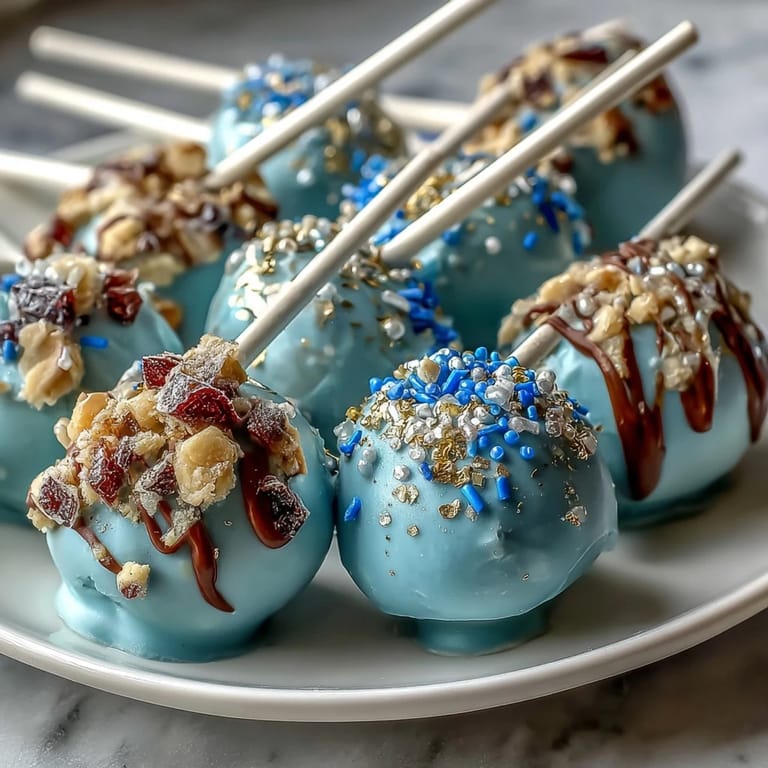
 My friend texted me three weeks before graduation asking if I could make something special for the class celebration, and my mind immediately went to cake pops in our school colors. There's something about watching people's faces light up when they bite into one of these little treasures—the way the candy shell cracks and releases that soft cake inside feels like the perfect metaphor for moving forward. The gold sprinkles seemed like the obvious choice for marking such a big moment, turning each pop into a tiny celebration you could hold in your hand.
I spent an entire Saturday afternoon with my younger sister helping me roll, dip, and decorate, and she kept critiquing my frosting consistency while sneaking bites of raw cake crumbles straight from the bowl. We laughed about how messy chocolate coating gets under your fingernails and debated whether the gold glitter was too much (it wasn't). By the time we finished, we had 24 perfect little pops lined up in the Styrofoam block like an edible army, and I realized this recipe had become less about the dessert and more about having someone in the kitchen who believed it would turn out beautifully.
Ingredients
- 1 box vanilla or chocolate cake mix (with required ingredients like eggs, oil, water): Starting with a mix saves time and guarantees consistent results, but don't skip cooling the cake completely or your frosting will melt when you mix it in.
- 1/2 cup unsalted butter, softened: Room temperature butter creams faster and smoother—take it out of the fridge 30 minutes before you need it, or cut it into small cubes to speed things up.
- 1 1/2 cups powdered sugar: Sift it first if you have lumps, or just press it through a fine mesh strainer to prevent grainy frosting.
- 1 tablespoon milk: This adjusts the frosting's consistency, so add it slowly and stop when you reach that sweet spot between spreadable and fluffy.
- 1 teaspoon vanilla extract: Real vanilla tastes noticeably better than imitation here since frosting isn't baked down.
- Pinch of salt: Balances sweetness and makes the frosting taste more sophisticated than you'd expect.
- 450 g candy melts in two school colors: Candy melts are more forgiving than chocolate because they don't require tempering, making them perfect for dipping.
- 2 tablespoons vegetable shortening or coconut oil: This is optional but honestly worth it—it thins the melts just enough to create a smooth, snappy coating instead of a thick layer.
- Gold sprinkles or edible gold glitter: Apply these while the coating is wet or they'll slide right off, and a light hand looks more elegant than heavy coverage.
- 24 lollipop sticks: Make sure they're food-grade and rated for cake pops, not craft sticks.
- Styrofoam block: This holds your pops upright as they dry—you can also use a block of floral foam from a craft store.
Tired of Takeout? 🥡
Get 10 meals you can make faster than delivery arrives. Seriously.
One email. No spam. Unsubscribe anytime.
Instructions
- Bake and cool the cake:
- Follow the box instructions exactly, then let the cake rest on the counter until it's completely cool to the touch. Warm cake will break apart when you crumble it and won't hold together properly later.
- Whip up the frosting:
- Beat the softened butter on medium speed for about 2 minutes until it's pale and creamy, then gradually add the powdered sugar while mixing to avoid a cloud of powder coating your kitchen. Once it looks smooth, add the milk, vanilla, and salt, then beat for another minute until it's light and fluffy.
- Crumble and combine:
- Break the cooled cake into bite-sized pieces directly into a large bowl, then add your frosting slowly—about a quarter cup at a time—mixing with your hands until the texture resembles wet sand that holds together when squeezed but doesn't feel sticky or greasy. This balance is crucial because too much frosting makes mushy pops and too little makes them crumbly.
- Roll into balls:
- Scoop about 1 tablespoon of mixture at a time into your palm, roll it quickly into a ball, and place it on a parchment-lined baking sheet. If your hands get sticky, dip them in cold water between rolls.
- Chill thoroughly:
- Refrigerate for at least 1 hour or freeze for 30 minutes until the balls feel firm and don't squish when you gently press them. Cold cake balls dip much more cleanly into the candy coating.
- Secure the sticks:
- Melt a small amount of candy melts, dip the end of each stick into it like you're sealing an envelope, then gently push it halfway into a chilled cake ball. Let these sit for a few minutes so the melted candy sets and locks the stick in place.
- Dip and coat:
- Melt your school colors in separate microwave-safe bowls, stirring in the shortening if you're using it for a silkier finish. Working with one color at a time, dip each cake pop into the melted coating, give it a gentle half-turn to release excess, then flip it upright and tap the stick against the bowl rim once more.
- Add the sparkle:
- Immediately after dipping while the coating is still wet, sprinkle gold sprinkles or edible glitter over the top. Work quickly because once the candy starts to set, the toppings won't stick.
- Set and harden:
- Place each finished pop upright in the Styrofoam block and let them sit undisturbed at room temperature for at least 30 minutes until the coating hardens completely and feels solid to the touch.
 Pin Now
 Standing in the school gymnasium at the graduation party, watching classmates grab these little pops and bite into them with genuine delight made me realize that homemade means something different to teenagers than it does to adults. They tasted the care in every bite, not just because of the fancy gold finish, but because someone they knew had actually stood in a kitchen and made them with intention. That's when food stops being sustenance and becomes a memory people carry.
The Color Strategy That Actually Matters
When you're picking your school colors, think about contrast and coverage. If your colors are two shades of blue, the darker one might look muddy when applied to a thin coating, while a navy paired with white or silver will photograph beautifully and look crisp on the actual pop. I also learned that if you're using a really dark color like maroon or forest green, a thin coat tends to look more elegant than a thick one—it's less about coverage and more about creating a sophisticated tint.
Timing Matters More Than Perfection
Some of my pops had slightly uneven coatings or spots where the gold settled unevenly, and honestly nobody noticed because I presented them with confidence and they tasted incredible. The people eating them aren't examining each one like it's a piece of fine art—they're happy to be holding something special that took effort. Focus your perfectionism on the taste and the moment, not on making them look like they came from a professional bakery.
Storage and Styling Tips
These cake pops taste best within the first 24 hours while the coating still has a slight snap to it, but they'll keep for three days at room temperature in an airtight container without losing quality. If you're making them a day or two ahead, add the gold sprinkles just before serving so they don't get dull from sitting. For presentation, consider wrapping the stick with a small ribbon in your school colors or placing them in a clear cellophane bag tied with twine—these small touches make them feel intentional and giftworthy.
- Store in a cool, dry place away from direct sunlight or heat sources that could melt the coating.
- If you need to refrigerate them, bring them back to room temperature 15 minutes before serving so the coating isn't too firm and the cake flavor shines through.
- These freeze beautifully for up to two weeks if you need to make them well in advance for a busy graduation season.
 Pin Now
 Every time I make these, I'm reminded that celebration foods don't need to be complicated to feel meaningful—they just need to come from a place of genuinely wanting to mark something important. These cake pops will taste like graduation tastes, which is exactly what you're aiming for.